
THE SIXPLANETS BLOG
How to prepare artwork for no-minimum custom t-shirts
Ordering custom t shirts no minimum? Prepare sharp artwork, choose the right background, check print size, and approve your proof before Frisco production.
By sixplanets · Published About 12 min read
In this guide
Prepare artwork for no-minimum custom t-shirts by setting the intended print size, using a sharp source file, removing any unwanted background, and checking every word before submitting it. Approve the final artwork proof before printing; no minimum order means you can order one shirt, not skip the artwork checks.
TL;DR- Sixplanets offers custom t shirts no minimum, with a design preview and final artwork proof approval before printing.
- Prepare artwork at its intended print size; enlarging a small image does not restore missing detail.
- Check background, lettering, garment color, and placement before approving your custom apparel proof.
- Production takes 5–7 business days after proof approval; shipping transit is additional.
How do you prepare artwork for no-minimum custom t-shirts?
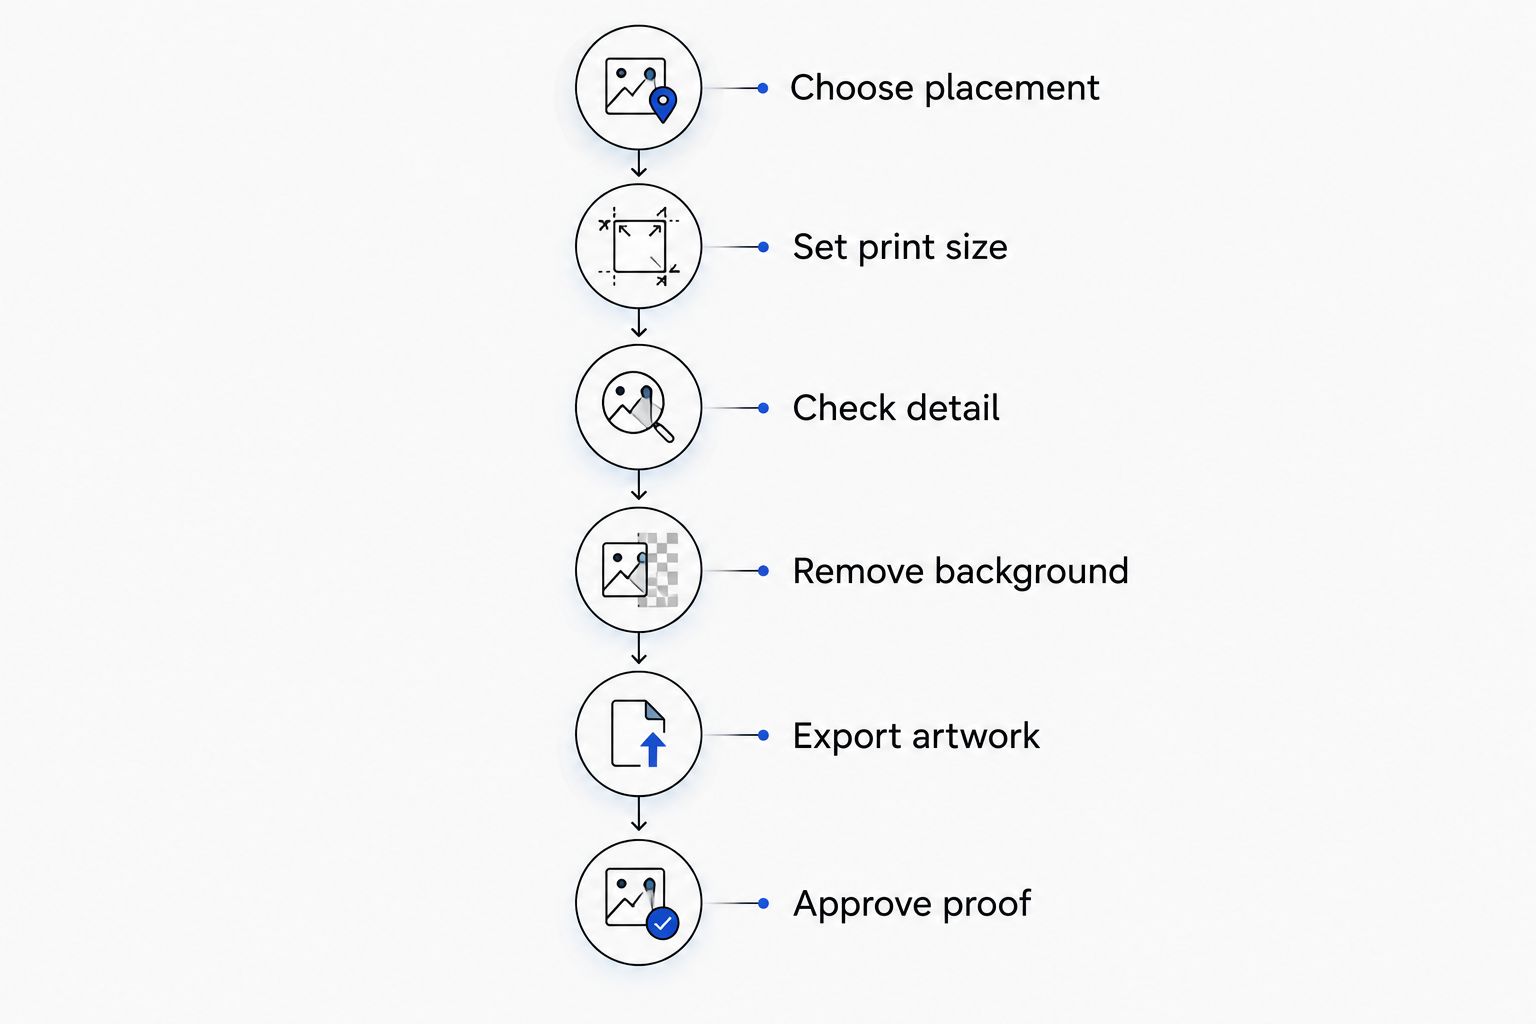
Start with the best original artwork you have. Then work through the steps below before you submit it. The guide to ordering custom t-shirts with no minimum covers the order itself; this checklist covers the file and decisions that make your proof easier to review.
- Choose placement. Decide where the design belongs and describe the intended print area.
- Set print size. Evaluate the artwork at the physical size you want on the shirt.
- Check detail. Inspect lettering, outlines, fine lines, and image edges.
- Remove background. Keep only backgrounds that belong in the finished design.
- Export artwork. Save a clean file and retain an editable original.
- Approve proof. Check the final artwork and placement before printing begins.
For a 2026 merch launch, complete these decisions before you announce when buyers can collect their shirts. Artwork revisions and proof approval belong before production, not inside a promised delivery window.
Why this matters
A single shirt deserves the same artwork attention as a larger run. A misspelled name, unwanted rectangle, or unclear placement still matters when you order just one. No minimums remove the quantity requirement; they do not repair the source file.
Sixplanets custom t-shirt printing is best for individuals, bands, and creators who need no-minimum DTF apparel. The studio produces locally in Frisco, offers premium blanks, and inspects orders by hand. You also get a design preview and final artwork proof approval before printing.
The planning constraint is clear: production takes 5–7 business days after proof approval, with shipping transit additional. For nearby DFW buyers, free Frisco pickup removes the shipping leg, not the production period.
Choose placement before polishing the file
Give each design a destination. A front graphic, back graphic, and small chest mark are different artwork decisions, even when they share the same logo. Describe each location clearly rather than submitting several files with no explanation.
Think about how people will use the shirt. Band merch needs a deliberate graphic arrangement. Staff apparel needs readable identification. A one-off gift needs accurate names, dates, and spelling. Choose the layout that serves the job, then prepare that layout for printing.
Write down:
- The garment color you want the artwork reviewed against.
- The intended print location for each design.
- The desired physical size, if you have decided it.
- Which file belongs to which location.
- Any detail that must stay exactly as supplied.
Do not assume that the artwork's position on a document page communicates its position on a shirt. A logo centered on a large white canvas still needs a placement instruction. The final proof is where you check that instruction visually.
Set print size before judging resolution
Check image quality at the intended print size, not just on your phone. A small picture can look crisp on a screen and show rough edges when enlarged. Increasing its pixel dimensions does not recreate detail absent from the original.
For raster artwork, 300 pixels per inch is a common print-preparation target, not a guarantee of print quality or a substitute for the studio's file review. At that target, an image intended to print 10 inches wide needs 3,000 pixels across. The source still needs clean edges and readable detail.
Use those figures to evaluate your file, not to invent a print size you do not want. If the original image is too small, find the original export, recreate the artwork from editable elements, or ask for artwork help. Do not repeatedly enlarge and resave a screenshot.
For your 2026 artwork folder, keep the original file beside the export. That makes later corrections simpler and prevents a compressed preview from becoming the only surviving version.
Pick a file type that preserves your artwork
The right preparation format depends on what the design contains. The table below explains common file types; confirm the submission format before sending your order. A filename extension alone does not prove that the artwork is sharp, transparent, or editable.
| Preparation format | Best for | Main advantage | Main limitation |
|---|---|---|---|
| PNG | Raster artwork needing a transparent background | Supports transparency and lossless image storage | Still depends on sufficient pixel dimensions |
| JPEG | Photographs with an intentional full background | Useful for photographic source images | Does not support transparency; compression can affect detail |
| Vector PDF | Logos and lettering created as vector shapes | Vector elements scale without pixelation | A PDF can also contain low-resolution raster images |
PNG: inspect the transparent areas
A PNG can preserve a transparent background, but it can also contain an opaque white rectangle. Open the file over a contrasting background to tell the difference. Check the edges for unwanted pale pixels left from background removal.
Keep intentional white artwork. Removing every white area is not the same as removing an unwanted background, especially when lettering or illustration details use white.
JPEG: keep intentional photographic backgrounds
A JPEG makes sense as a source for a photograph whose full background belongs in the design. It does not provide transparency. If you want only the subject printed, background removal needs a separate artwork step.
Avoid saving the file repeatedly with heavy compression. Return to the original photograph when you need another export, and inspect the result at its intended size.
Vector PDF: check what is inside
A vector logo preserves clean geometric shapes when resized. But putting a screenshot into a PDF does not turn it into vector artwork. Inspect the actual content, not just the extension.
For lettering, retain an editable original and check that the exported file displays the intended typeface. Converting final lettering to outlines is a common way to preserve its appearance, but outlined text is harder to edit later.
Remove backgrounds without damaging the design
Ask a simple question: should the rectangle around this artwork appear on the shirt? If the answer is no, remove it deliberately. Do not expect a background to disappear because it looks similar to the garment color on your screen.
Check outside edges and enclosed spaces. The gaps inside letters, between illustrated objects, and around fine outlines are easy places to miss unwanted background pixels. Review the result against both light and dark backgrounds.
Keep a copy before making destructive edits. Automatic background removal can cut into lettering, hair, texture, or illustration details. It is a starting point for inspection, not proof that the file is ready.
For a design built around a rectangular photograph or poster-style composition, the background can be intentional. Keep it when it belongs. The goal is a deliberate design, not transparency for its own sake.
Why artwork preparation varies
Different designs need different checks. Use these factors to decide where to spend your attention:
- Source quality: An original illustration offers different editing options from a compressed screenshot.
- Physical print size: Enlarging raster artwork makes existing pixel limitations more visible.
- Background treatment: A full photograph and an isolated logo need different edge checks.
- Lettering: Small text, unfamiliar typefaces, and personalized names require careful review.
- Garment color: Artwork needs review against the intended shirt color, not just a white document.
- Print placement: A small chest mark and a large back graphic need separate layout decisions.
Do not treat one file as automatically ready for every placement. Review each version at the size and location you intend to approve.
Check lettering, spelling, and contrast
Read every word separately from the design. Familiar artwork is easy to skim, which makes errors easy to miss. Check names, punctuation, event details, web addresses, and any year printed on the shirt.
For a 2026 event shirt, verify the year in the artwork itself—not just in the filename or order notes. Compare it with the event details you are using. Artwork approval should confirm the content as well as the appearance.
Then inspect visual clarity. Small lettering and fine decorative lines deserve special attention at the intended print size. A design that works as a large poster needs another review when reduced to a chest graphic.
Check contrast against the garment color. Dark lettering on a dark shirt and pale lettering on a pale shirt can become difficult to read. Ask for help if you need an outline or another artwork adjustment rather than changing the design blindly.
Submit a clear artwork handoff
Send a clean final export with enough context to explain the order. Use descriptive filenames that distinguish the front from the back and the approved version from an earlier draft. Avoid sending a pile of near-identical files and leaving the intended version unclear.
A useful handoff includes:
- The artwork file for each print location.
- A plain-language placement description.
- The intended garment color.
- The desired print size or a request for help choosing it.
- Any unresolved artwork question.
- Your event date and pickup or shipping preference.
Keep notes out of the print artwork unless they are part of the design. Put instructions in the order communication, not inside the graphic where they can be mistaken for printable content.
Sixplanets offers help with artwork and larger projects. Ask before approving if you are unsure about image quality, background cleanup, or placement. A clear question is more useful than silently hoping the file will work.
Start your custom shirt order
No minimums. Get a design preview and approve the final artwork proof before printing.
Start your orderWhat should you check on the final artwork proof?
Check the final proof for content, size, placement, and the intended garment color. Compare it with your original instructions rather than reviewing it from memory. Confirm which graphic belongs on each side of the shirt.
Look closely at the details you edited: removed backgrounds, changed lettering, corrected spelling, and revised placement. A design preview helps you assess the direction; final artwork proof approval is the decision before printing.
When does production start after artwork approval?
5–7 business days after proof approval is the production period at Sixplanets. Shipping transit is additional. Do not count from the day you started preparing the artwork or first asked a question.
For a 2026 DFW event, plan the approval date alongside the event date. The Frisco pickup planning guide helps local buyers separate production planning from collection. Confirm any time-sensitive requirement; do not assume same-day or rush service.
Can you order one shirt before a larger merch project?
One shirt is an option because there is no minimum order. A physical sample lets you assess your design on a garment before deciding how to approach a larger project. It is useful, but it adds its own production stage to your schedule.
Approve the sample artwork carefully. If you change the graphic, garment choice, or placement afterward, review those changes rather than treating the first shirt as approval of a different design.
FAQ
How do I prepare artwork for custom t shirts no minimum?
Prepare the artwork at its intended print size, remove unwanted backgrounds, check lettering, and identify each print location. Review and approve the final artwork proof before printing.
Can I order just one custom t-shirt from Sixplanets?
Yes. Sixplanets offers no-minimum custom DTF apparel, so you can order one shirt. The design preview and final artwork proof approval still apply.
Is a PNG better than a JPEG for a shirt logo?
A PNG is better suited to a raster logo that needs transparency because JPEG does not support transparent backgrounds. Check the PNG itself; the format does not guarantee that its background has been removed.
What resolution should I use for t-shirt artwork?
300 pixels per inch at the intended print size is a common raster-artwork preparation target. Source quality still matters, and enlarging a small file does not restore missing detail.
Can I use a screenshot for my custom shirt design?
Use the original artwork instead of a screenshot whenever you have it. Screenshots can include unwanted interface elements, backgrounds, and insufficient detail for the intended print size.
How long does production take after I approve my proof?
Production takes 5–7 business days after proof approval. Shipping transit is additional, and free Frisco pickup does not shorten production.
Can I get help if my artwork is not ready?
Yes. Artwork help is offered, so raise questions about backgrounds, image quality, or placement before approving the final proof. Keep your original source file for any revisions.
One last thing
Name the final export clearly and keep the editable original. For your 2026 project, archive the approved proof with both files. That gives you a specific reference for a reorder instead of relying on a remembered layout.
Your most useful final check is against the proof, not the filename. A file called final can still contain the wrong date, background, or placement.